
Auto-Updating Your Github Profile With Python

Background
Lately, I have been seeing an increasing number of developers on Github with a profile level README.md, and I wanted to create the same thing. I saw this as another opportunity to communicate what I am about. I also feel like it’s a great place to funnel a technical audience towards things that are important to me, which right now are these articles that I have been working on over these past few weeks. Also, if you as a reader are currently looking increase your authority amongst your peers, clients or potential employer this could be yet another opportunity to impress. As a hiring manager in tech, I would also be measurably impressed by anyone who took the extra effort to showcase their skills through their Github profile.
One of the things that I wanted to showcase were articles like this one that I am working on. I am creating a number of articles every week which would require me to remember to go and update these every time I publish. As a developer this was going to be unacceptable as I expect would be the reaction for a number of you reading 😉.
This led me to search for what the greats before me that have done for this type of automation already. During this search, I found a number of Go tutorials, and a really nice JavaScript tutorial which I have linked in the footer.
Using this as inspiration I figured that I would build this myself, as I had not been able to find someone doing this with Python in a way that I liked. With this challenge accepted I now needed to search for the required components to keep my Github Profile Readme up-to-date.
For those of you not willing to wait to see the results. You can take a look at the results for yourself in the image below.
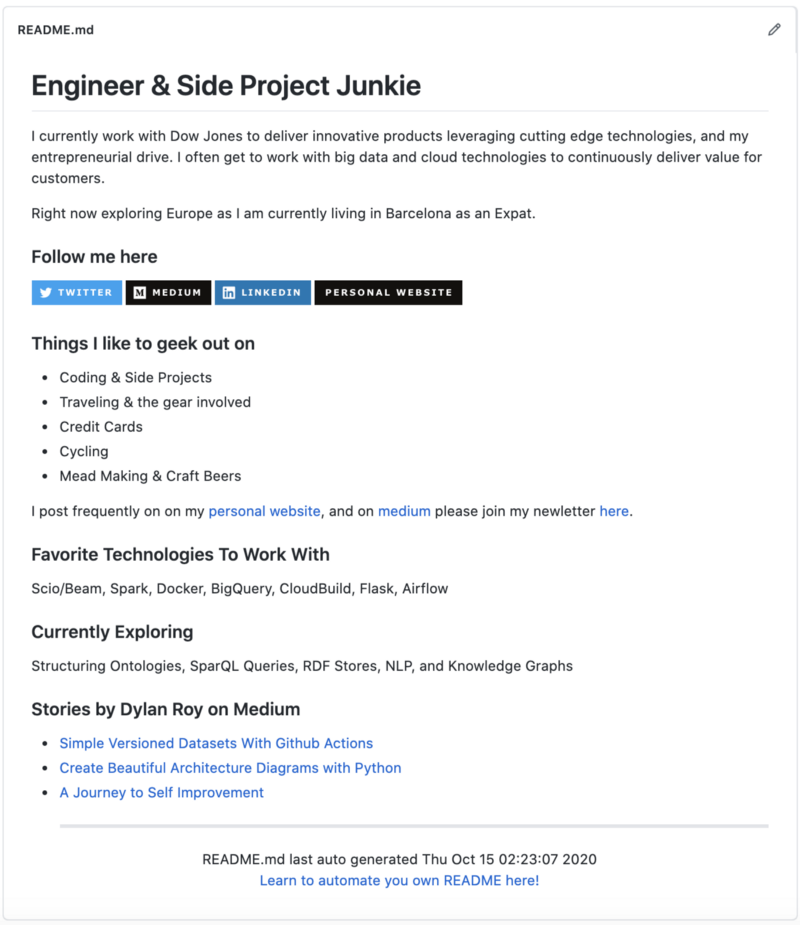
Getting Started
The part of my README page that I want to automate, as you can see above, is going to be the feed of recent articles on Medium. In order to easily do this, I will need a python library for parsing an RSS feed. In addition to that, I would like to append a footer with the current timestamp in my timezone to indicate when the last update has been pushed since this isn’t illustrated anywhere within the Github profile landing page. All of this will happen in my language of choice at the moment, Python 3.8, so if you are following along make sure to use Python 3 as there’s some file I/O that is Python 3 specific.
Libraries
Here are the libraries that I decided to use based upon what has been mentioned earlier that were needed to achieve this.
feedparser —A library with a parser for Atom and RSS feeds. I could have built out my own parser and used urlib or requests, but I am okay adding this dependency.
pytz — Allows us to provide a human readable name for the timezone we want to so that we have a timezone aware timestamp. This is probably achievable via the tzinfo from the standard library, but this library is a crutch that I am willing to use for this purpose.
Concepts
Though you should be able to pretty much clone my repo, and work from that or just copy and paste from this article. It will be useful to know what the following concepts are. If anything else within this article deserves to be here let me know in the comments, and I can add it for any future readers interested in automating parts of their Github Readme profile.
Github Actions — Github’s CI/CD solution allowing for us to create, and a workflow to update our Github readme profile.
Really Simple Syndication (RSS) — A standardized feed format that allows users or applications, in this case, to automatically check for new content.
Start Building
My first step for building this out will be the same for you if you haven’t already done this. I needed to create a self-named Github repository take advantage of the Github Profile feature. So with the following repo, I was ready to start building out my README.md file.
dylanroy/dylanroy
I currently work with Dow Jones to deliver innovative products leveraging cutting edge technologies, and my…github.com
Our Readme Profile
To identify which portions of my README.md I want to update I just searched the markdown file for phrase “### Stories by Dylan Roy on Medium”, and appended the new content as you will see later in this article when I go through the code used to update the readme.
In future iterations, I will likely just have a master template that I update, instead of this crude method, though that can wait for another day when I decide that I want to add more dynamically updated information to my profile.
Python Code
So the code for the automation we want to create is pretty simple. First we will be reading an RSS feed, that Medium makes available, using feedparser.
The next step is to find all of the items listed within the feed, and check if they have tags associated with the post. This has been the only way that I have been able to identify which items are actual stories that I post, and which ones are comments made. Medium should really change this as this is quite a hack.
After we have the comments filtered out we then join the list of stories into a markdown list, and append that to the end of the current readme stripping the old list of stories using Python string’s find function to identify where the title is located.
Once seeing how this looked I saw that there was something missing when viewing the Profile in Github. If the sync failed for some reason I wouldn’t know if the information was stale just by looking at the readme.
In order to make this apparent to readers of my profile, and me when debugging issues. I needed to append a footer with the latest update date as shown below in the final product.

The first thing I did was create a footer template as shown below. In this template I was just using the templating syntax that’s use for python string interpolation.
<hr>
<div align="center">
README.md last auto generated {timestamp}
<br>
<a href="https://medium.com/@dylanroy" target="_blank">Learn to automate you own README here!</a>
</div>
The code to update, and append the footer was quite simple. The first step was to get the time value I wanted updated in a format that worked for me. This is where the pytz library comes into play. I wanted it to be reflected using my timezone so I just configured the retrieved timestamp with that timezone.
After that it’s as simple as substituting that time using the standard Python format function.
NOTE: Instead of using the standard open function to open the file, and then reading the content. I use the Path object to read the contents of the file in one go. Otherwise I would need to close the file stream after or set a scope for the file operations.
After that we just need to piece our functionality together for the Github Action to run. The steps are simple.
- Read the old readme with our hand Path object.
- Output the updated readme to a variable
- Write this content to the file, and append the updated footer.
Below is the full code so that it’s easier to replicate for your own purposes imports, and all.
Automate With Actions
Now I just needed to build out the workflow for the Github Action that needs to be scheduled.
In a previous write up I had actually described how to build out an Action workflow to keep a dataset up-to-date so if you have already read that you will just be stepping through the motions at this point as these workflows are pretty similar. Since I have already written this up I will not be going too in-depth on each step.
Simple Versioned Datasets With Github Actions
In Less Than 10 Lines Of Python — Preserving The History of Notable CEOstowardsdatascience.com
Firstly we want to schedule our action to run. In this example I just picked 5:05 am. These actions use the cron syntax for scheduling so this step was pretty straightforward.
The next thing that needs to be defined in Github Action workflows are the OS that we want to execute the action on. Though in the future I will likely use a lighter image, I chose the latest ubuntu to run on.
The initial steps for this are steps that I basically just copy, and paste to each action I create. They are for the following purposes in this order. Getting a working copy of the Github repository, setting up Python 3.8, and installing the requirements for the Python script that will be executing.
At this point in the workflow everything that is required to run our code to update the dataset has been provided to the environment so in this step we will now do just that.
At this point we have the updated version of our readme, and all that’s left is to commit these changes. The following commands do just this and push those changes. At this point, we have executed all that we needed to for instructing our Action to automatically update our readme.
Like in the previous steps here is the full Github Action workflow. Make sure to place this in the .github/workflows directory, and you are all set.
There’s only one additional improvement I will be making to my readme in the future. That will be having a conditional deploy for my readme updates. Right now I have a commit for everyday, but it would make sense to only update when new posts appear. This method is employed in my other post below where I have a conditional deploy for a versioned dataset that I link below.
Key Takeaways
It’s actually pretty easy to automate with actions. In this case, your Github Profile Readme would not only communicate who you are as a developer but also serve as a portfolio piece.
This document should help you get started in making you a more attractive candidate if you are looking for a job or looking to impress. The limits of what you can do really are just your imagination since there aren’t any explicit limits around public Github Repos. Once you get started it worth search through Github for some other examples of profile automations as there are some pretty creative ones. The one I was most impressed with was Tim Burgan’s where he has a public chess game in progress within his profile.
timburgan - Overview
Game is in progress. This is open to ANYONE to play the next move. That's the point. 👋 It's your turn! Move a white…github.com
Thanks for reading. I have linked my other tutorials below please take a look if they are of interest, and give me a follow to stay up-to-date on future articles.
Read Other Tutorials By Dylan
Create Beautiful Architecture Diagrams with Python
Stop spending time manually tweaking misaligned arrowstowardsdatascience.com
Simple Versioned Datasets With Github Actions
In Less Than 10 Lines Of Python — Preserving The History of Notable CEOstowardsdatascience.com
Resources
- Repository From This Article
- Actions Python Setup Github
- An Introduction To Github Actions that Was Useful To Me
- Another Article on Python Readme Profile Automation (Sending this guy some link karma as he was the only other person I could see that did this in Python.)
- Thomas Guibert’s Article on JavaScript Readme Profile Automation
- Koen Verburg’s Article on Go Readme Profile Automation
- Victoria Drake’s Article on Go Readme Profile Automation
Enjoying these posts? Subscribe for more
Subscribe nowAlready have an account? Sign in